Integration Flow Designer
It might sound crazy to say that RoboMQ, a little startup based out of Northern Virginia, has created the world’s first visual process builder for Microservices. But don’t take our word for it, read more, test out our product and find out for yourself the power of Integration Flow Designer a.k.a “flow”.
RoboMQ’s Integration Flow Designer is a revolutionary new product and the world's first Microservices based business process designer that allows you to build Complex Event Processing(CEP) by visually chaining Microservices. You would otherwise have to chain the microservices and build business processes using programming and lose the convenience and benefit of drag and drop.
This product offers a palette of nodes that represent Microservices running in a container management platform. Complex flows can be built by choosing the nodes and connecting them by simple drag and drop. Flow designer builds upon Microservices platform and offers a GUI for non programmers to use while offering all the benefits provided by RoboMQ like protocol adapters & connectors, auto scaling, guaranteed delivery and self healing capabilities
From SOA to Microservices and Integration flow designer
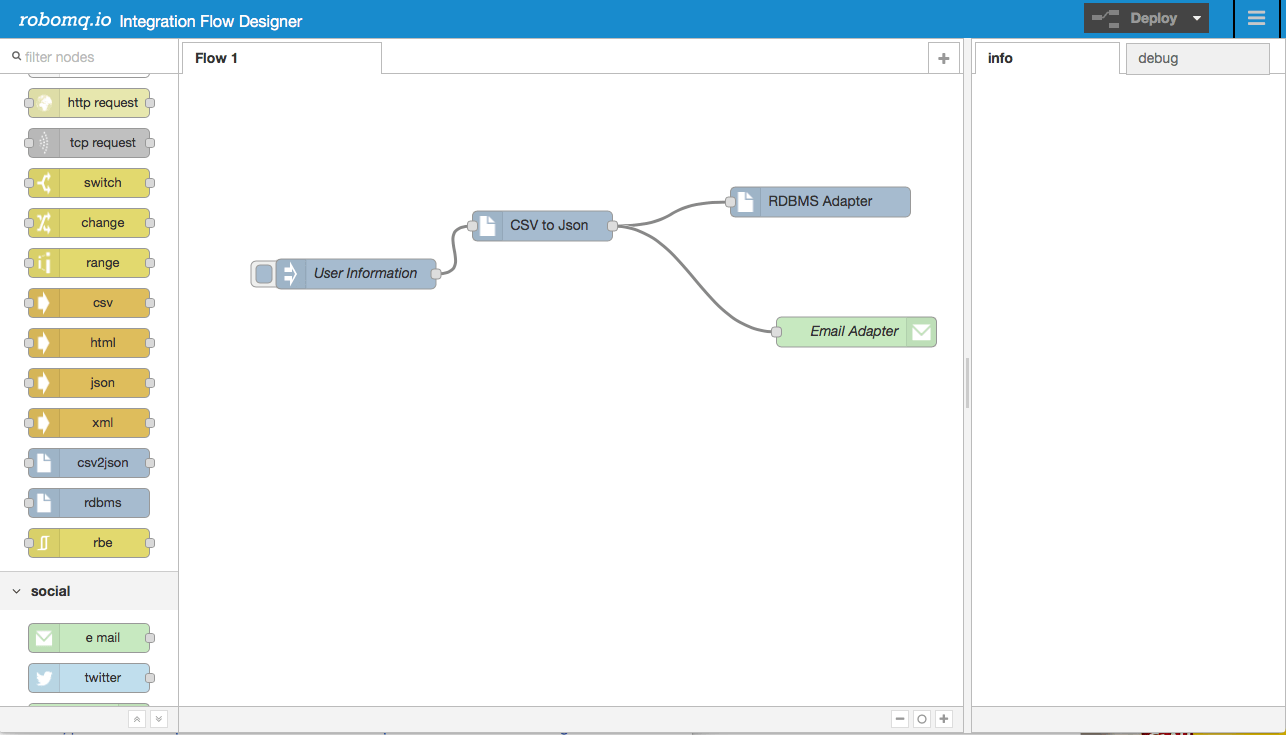
Fig. 1: Integration Flow Designer
The idea behind this game changing feature is pretty simple and evolutionary. Microservices have evolved from SOA(Service Oriented Architecture), trying to solve the issues around SOA and making the services truly atomic, independent, fine grained and composable. You could build business processes using the SOA artifacts, but that's old school and will have the known issues of SOA.
The Better way will be to use the Microservices architecture and build truly atomic, independent, fine grained and composable microservices that can be chained together to create complex event processing(CEP) and business processes that create competitive advantages for your business.
With RoboMQ Message Oriented Middleware(MOM) and ThingsConnect multi-protocol API gateway you could build microservices on RoboMQ Microservices platform.
You simply take a set of Microservices and chain them over message queues and you have a working business flow. This chaining is done through configurations that connect the Microservices running on cloud ( or on-premise) together to execute a sequence of functions or business processes. RoboMQ’s RoboMQ Microservices platform has already been providing this capability, but we wanted to make it even better.
What if-
- You could abstract the microservices as a simple widget
- What if the process that you build is simply a delegation mechanism that will have an army of microservices workers running in the cloud or for that matter across any network to execute your commands
While developers love the configuration and programming, a visual tool makes the Microservices platform user-friendly and intuitive for the analysts, designer and the architect. After hearing the comments of our customers, we did some research to see if a similar product already existed. After exhaustive research, we found no such tool to accommodate our needs. The fact that this tool did not exist was not surprising since Microservices are such a new technology. Thus, seeing a need in the market, we set about building a WYSIWYG(What You See Is What You Get) platform for this purpose.
How to build a complex event processing (CEP) or business flow?
The Integration Flow Designer presents a palette of nodes available to chain together to create a process. These nodes represent Microservices and are the basic constructs to build the business processes. Think of each node that you see on the palette as an independent, atomic and composable microservice or a business function.
Each node gets an input and provides an output and exceptionally an error. You create the chain of processing by connecting the output of the previous node to the input to the current node and the output of the current node to the input of the following. The error handling is built in the product which provides highly sophisticated capabilities of email, SMS or phone alert or an option to open a ticket or case and the Error Analytics component of RoboMQ.
Architecturally, Integration Flow Designer follows Flow Based Programming(FBP) principles. The edge nodes can read the data or write the data over any protocol to any end application using the ThingsConnect adapters and connectors themselves available as nodes.
Once a flow is visually built, you can click to deploy the flow... as simple as that. The flow runs on the cloud or on your on premise data center on the app server which itself is containerized. The flow executes and interacts with Microservices running on the container management platform (representing each node). It directs the Microservices to pick the task and execute it. In fact you are delegating each business function to not one but an army of microservices that could run across clouds, data centers and networks offering huge scaling, redundancy, resilience and reliability . The result of each node’s processing is written to the output and is picked up by the next node or the Microservice in the flow sequence. The end result is an orchestrated execution of a chain of Microservices using a simple visual user interface.
An example use case
Now that you have been introduced to Integration Flow Designer, read on for a detailed use case! The use case or the business flow being illustrated here is a new user registration flow. This could be one of the most common use case that most businesses encounter.
Our business process receives a user registration file containing the details of the users being registered in the system. The user information could be first name, last name, date of birth, address, phone and email. The users will be registered in the application and the user information coming in a CSV file will be saved to the registration database. An email will also be sent to the person responsible for the registration process upon registration completion.
This very simple use case consists of four steps:
- 1) Receive the registration information in CSV format
- 2) Transform registration data in system usable JSON format
- 3) Save the user information in the user database
- 4) Send an email to registration point of contact
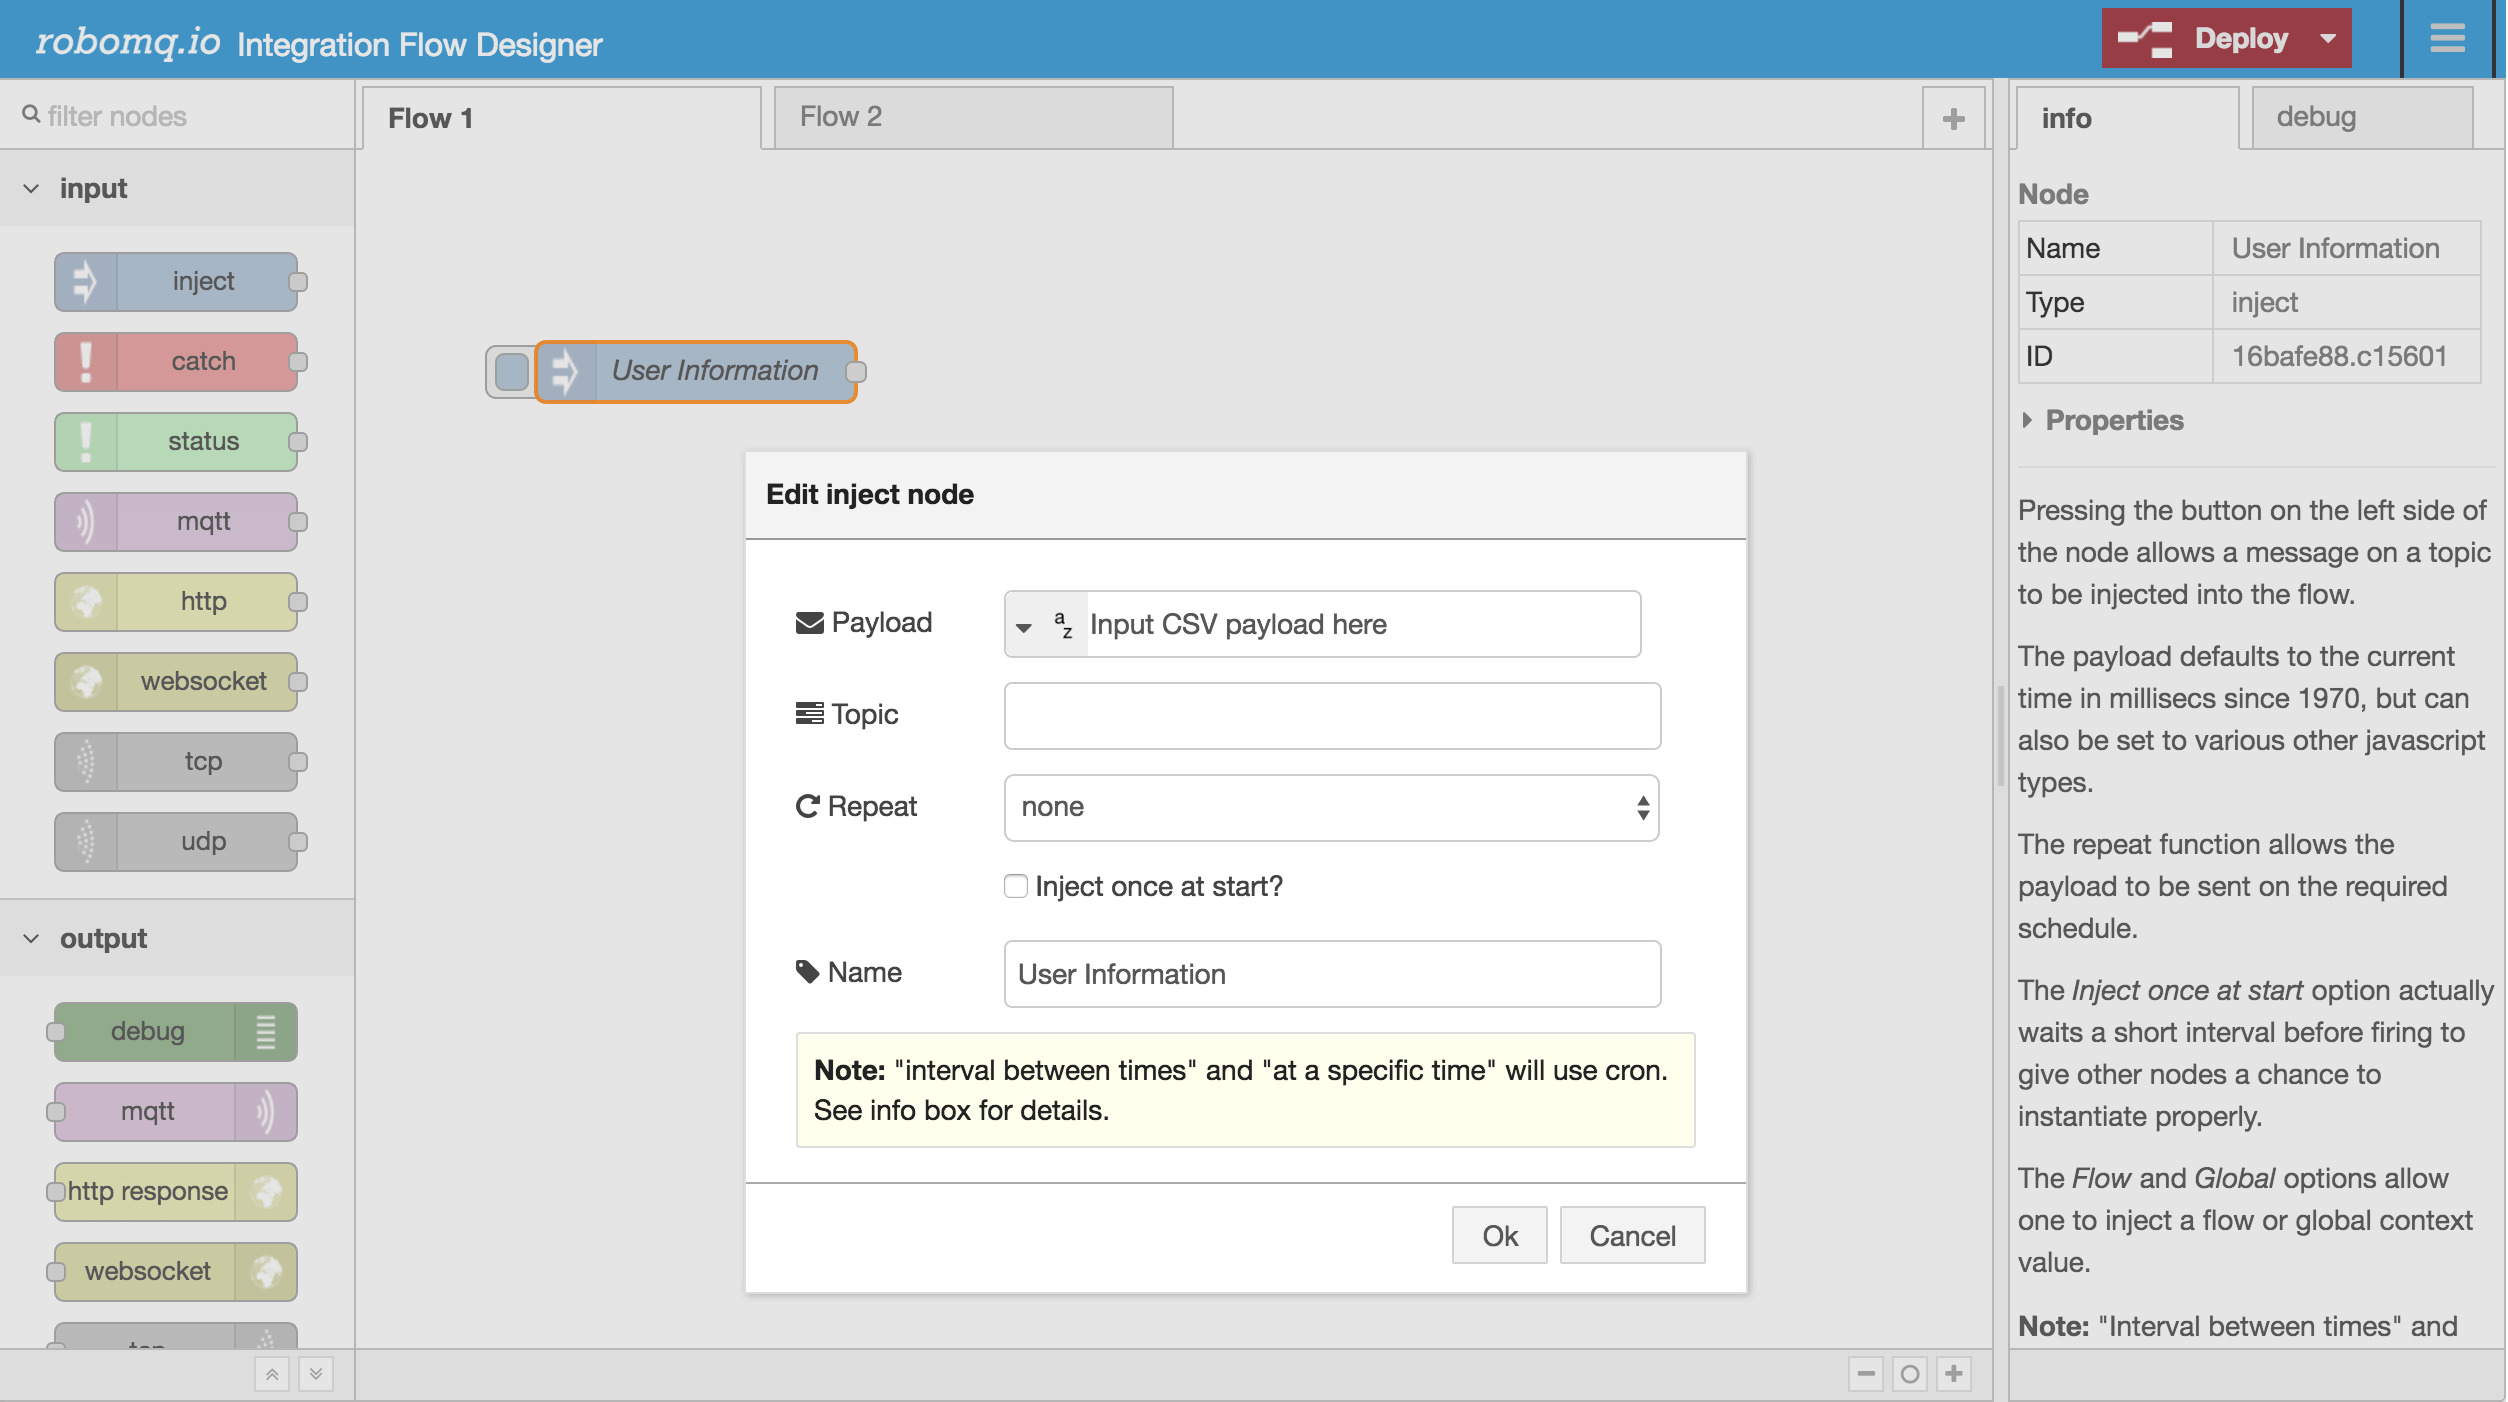
Fig. 2: Input node to inject use information in CSV format
We will use the input inject node for this purpose of sending the CSV data to the process. For a more complex processing, a FTP, SFTP or S3 adapter node could be used which will pull or receive the CSV file from a file location and make it available as input to the process.
The inject node shown above sends the CSV data to the next node in the flow which converts the CSV data to JSON format for the next stages of the processing. You could give it any meaningful name, like “User Information” as shown in the figure below.
Step 2: Transform registration data in more usable JSON format
The second step of the processing is transforming the input CSV data into JSON format. This transformation is simple for the purpose of demonstration. However, very complex transformations including data enrichment, validations and substitutions can be performed using nodes representing microservices providing complex data transformation capabilities.
Configuration of the transformation step is pretty simple as shown in the picture. All the magic of the processing is encapsulated in the Microservice. The transformation node in the pallet is just an abstraction which takes in an input and provides an output in line with principles of Flow Based Programming (FBP).
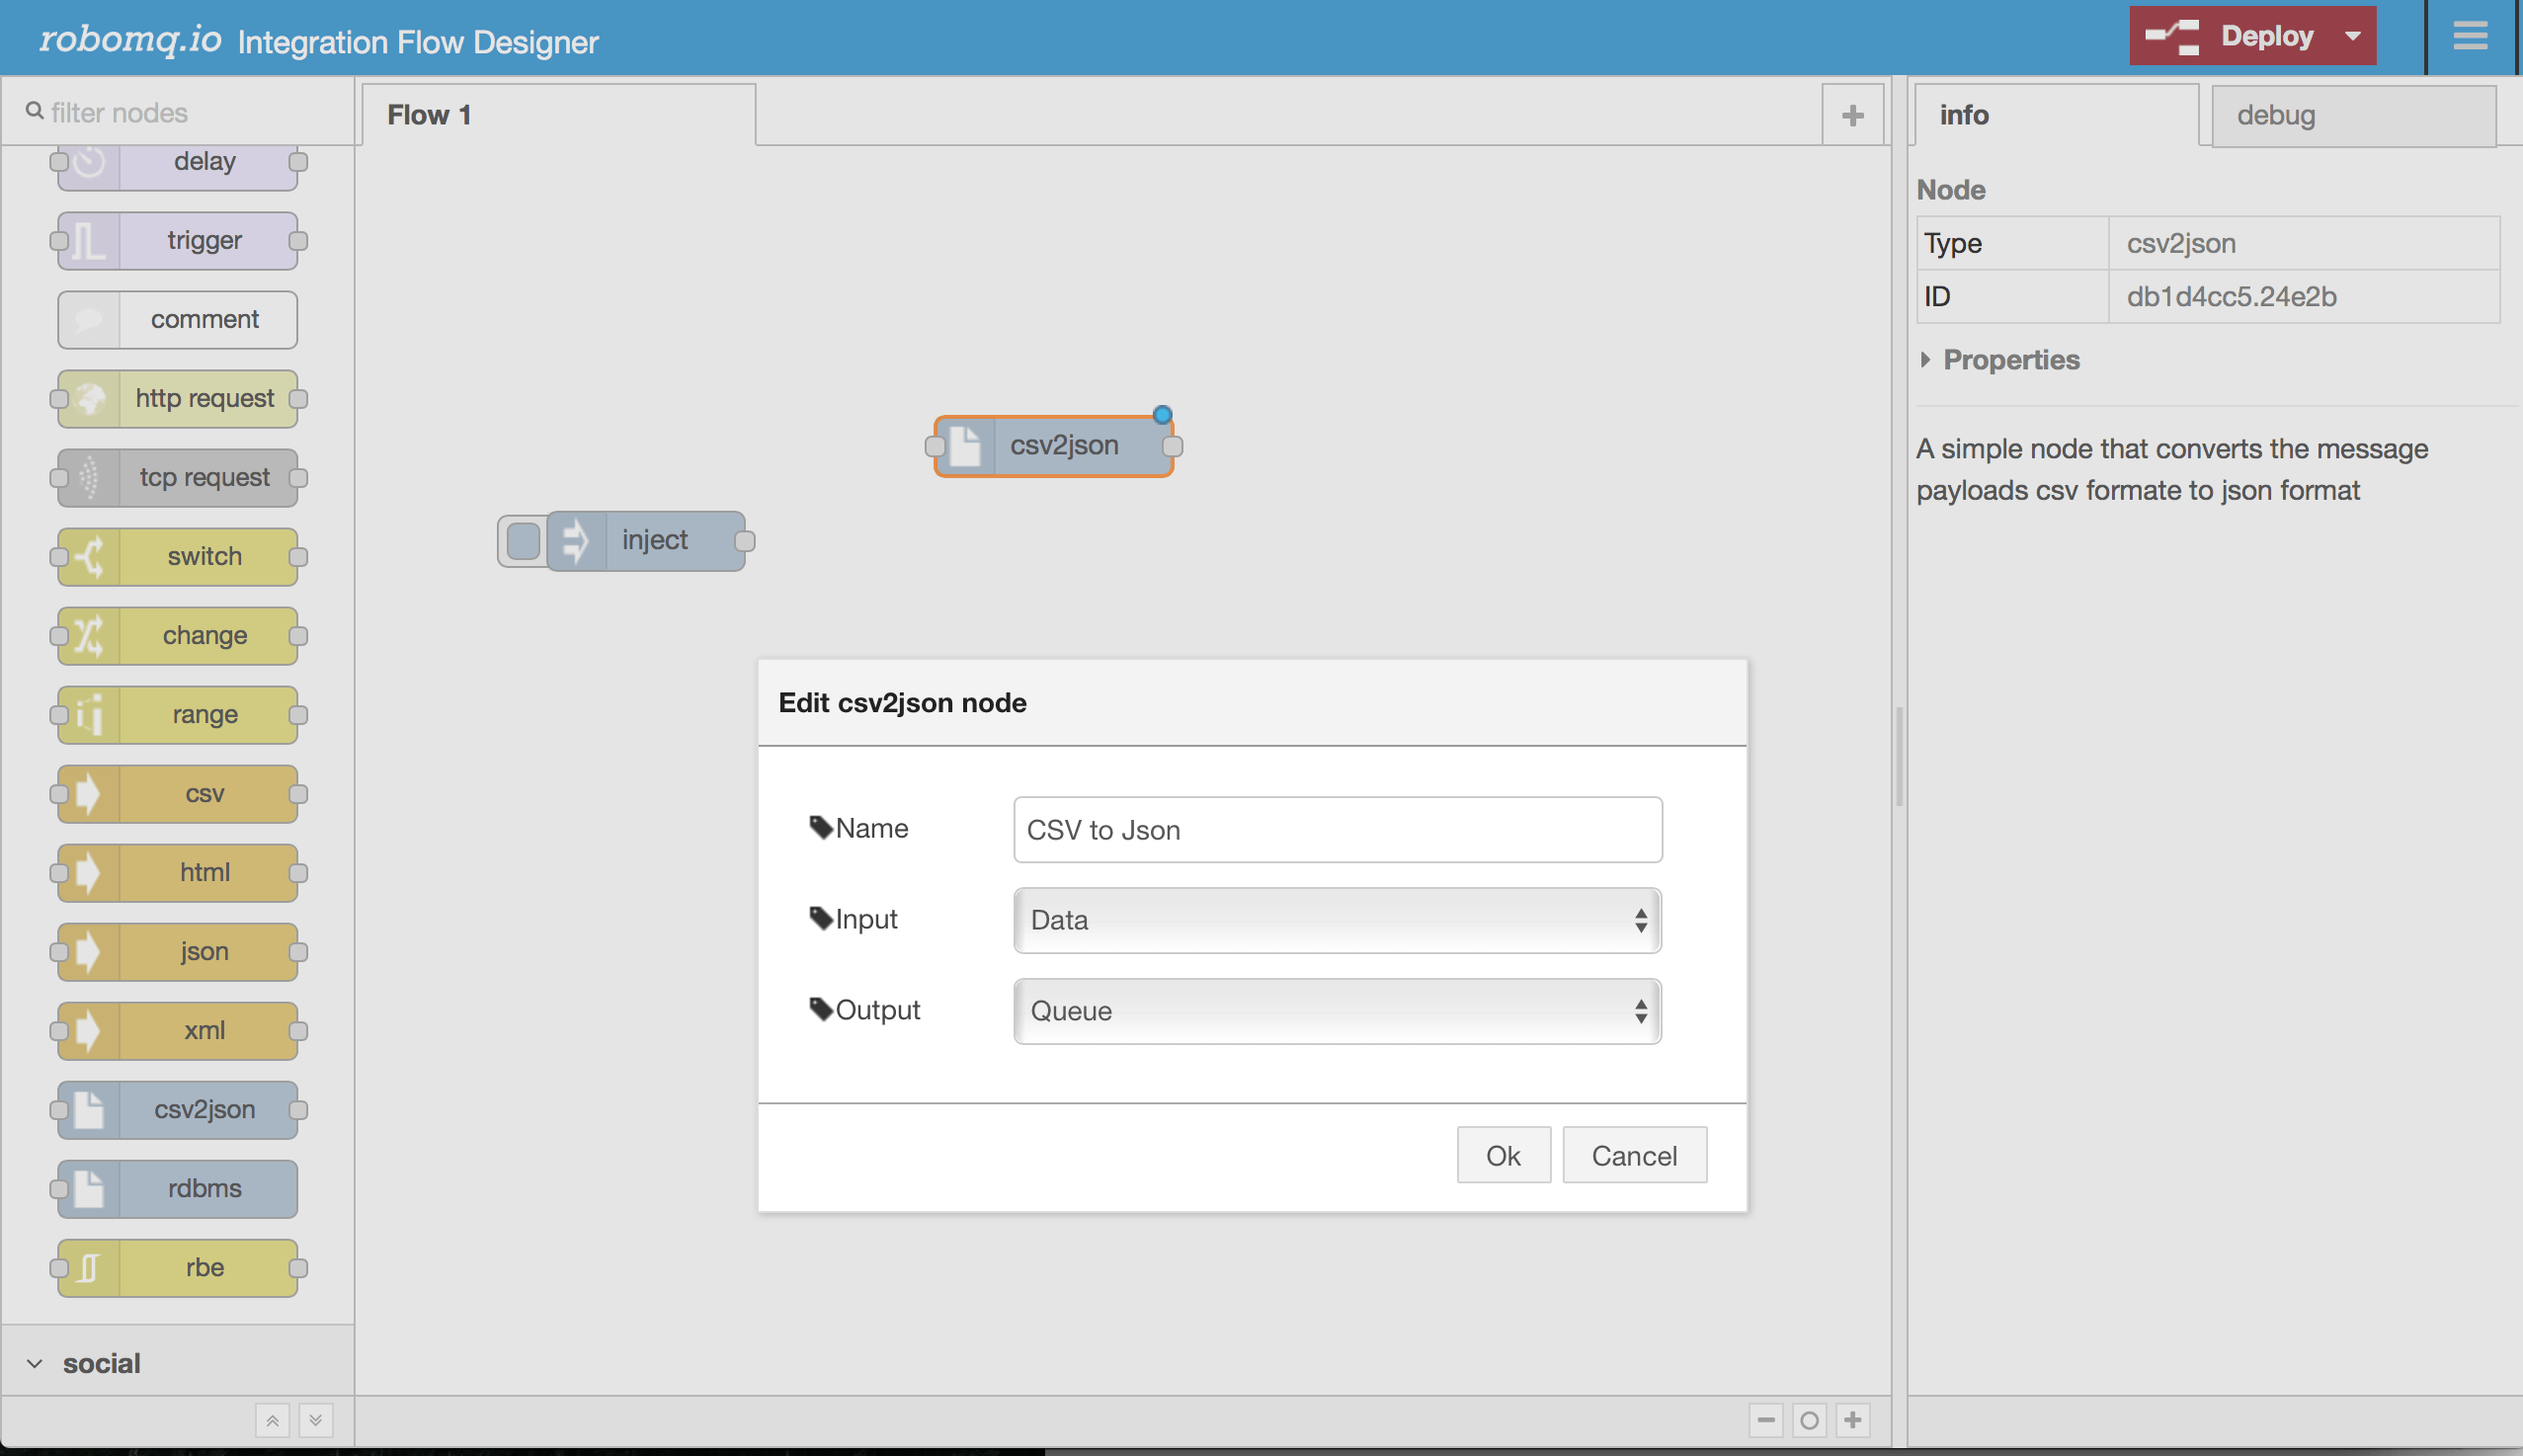
Fig. 3: Data transformation node for CSV to JSON conversion
For the transformation node “CSV to JSON”, we configure Input as “Data”. It means that the node (or the represented Microservice) will get the input as data from the previous node which is the inject node pushing CSV data to the flow. The CSV to JSON node will send the transformed output to the next node, which will pick it up as input via “Queues” on RoboMQ's messaging fabric. This input output linking is done by connecting the nodes visually as you will see in the step below. The processing of input data to the JSON formatted output is done by an army of Microservice workers running on the cloud.
Step 3: Save the user information in user database
The next step is to save the user information in the user registration database. The user information to be saved is received from the last node “CSV to JSON”. The CSV to JSON node is connected to the RDBMS node in sequence with the configured input/output flow.
We will use the “RDBMS” node for data persistence. This node represents a microservice providing a database adapter using RoboMQ ThingsConnect suite of adapters and connectors. This microservice will accept JSON data as input and save this data into any relational or big data database of your choice.
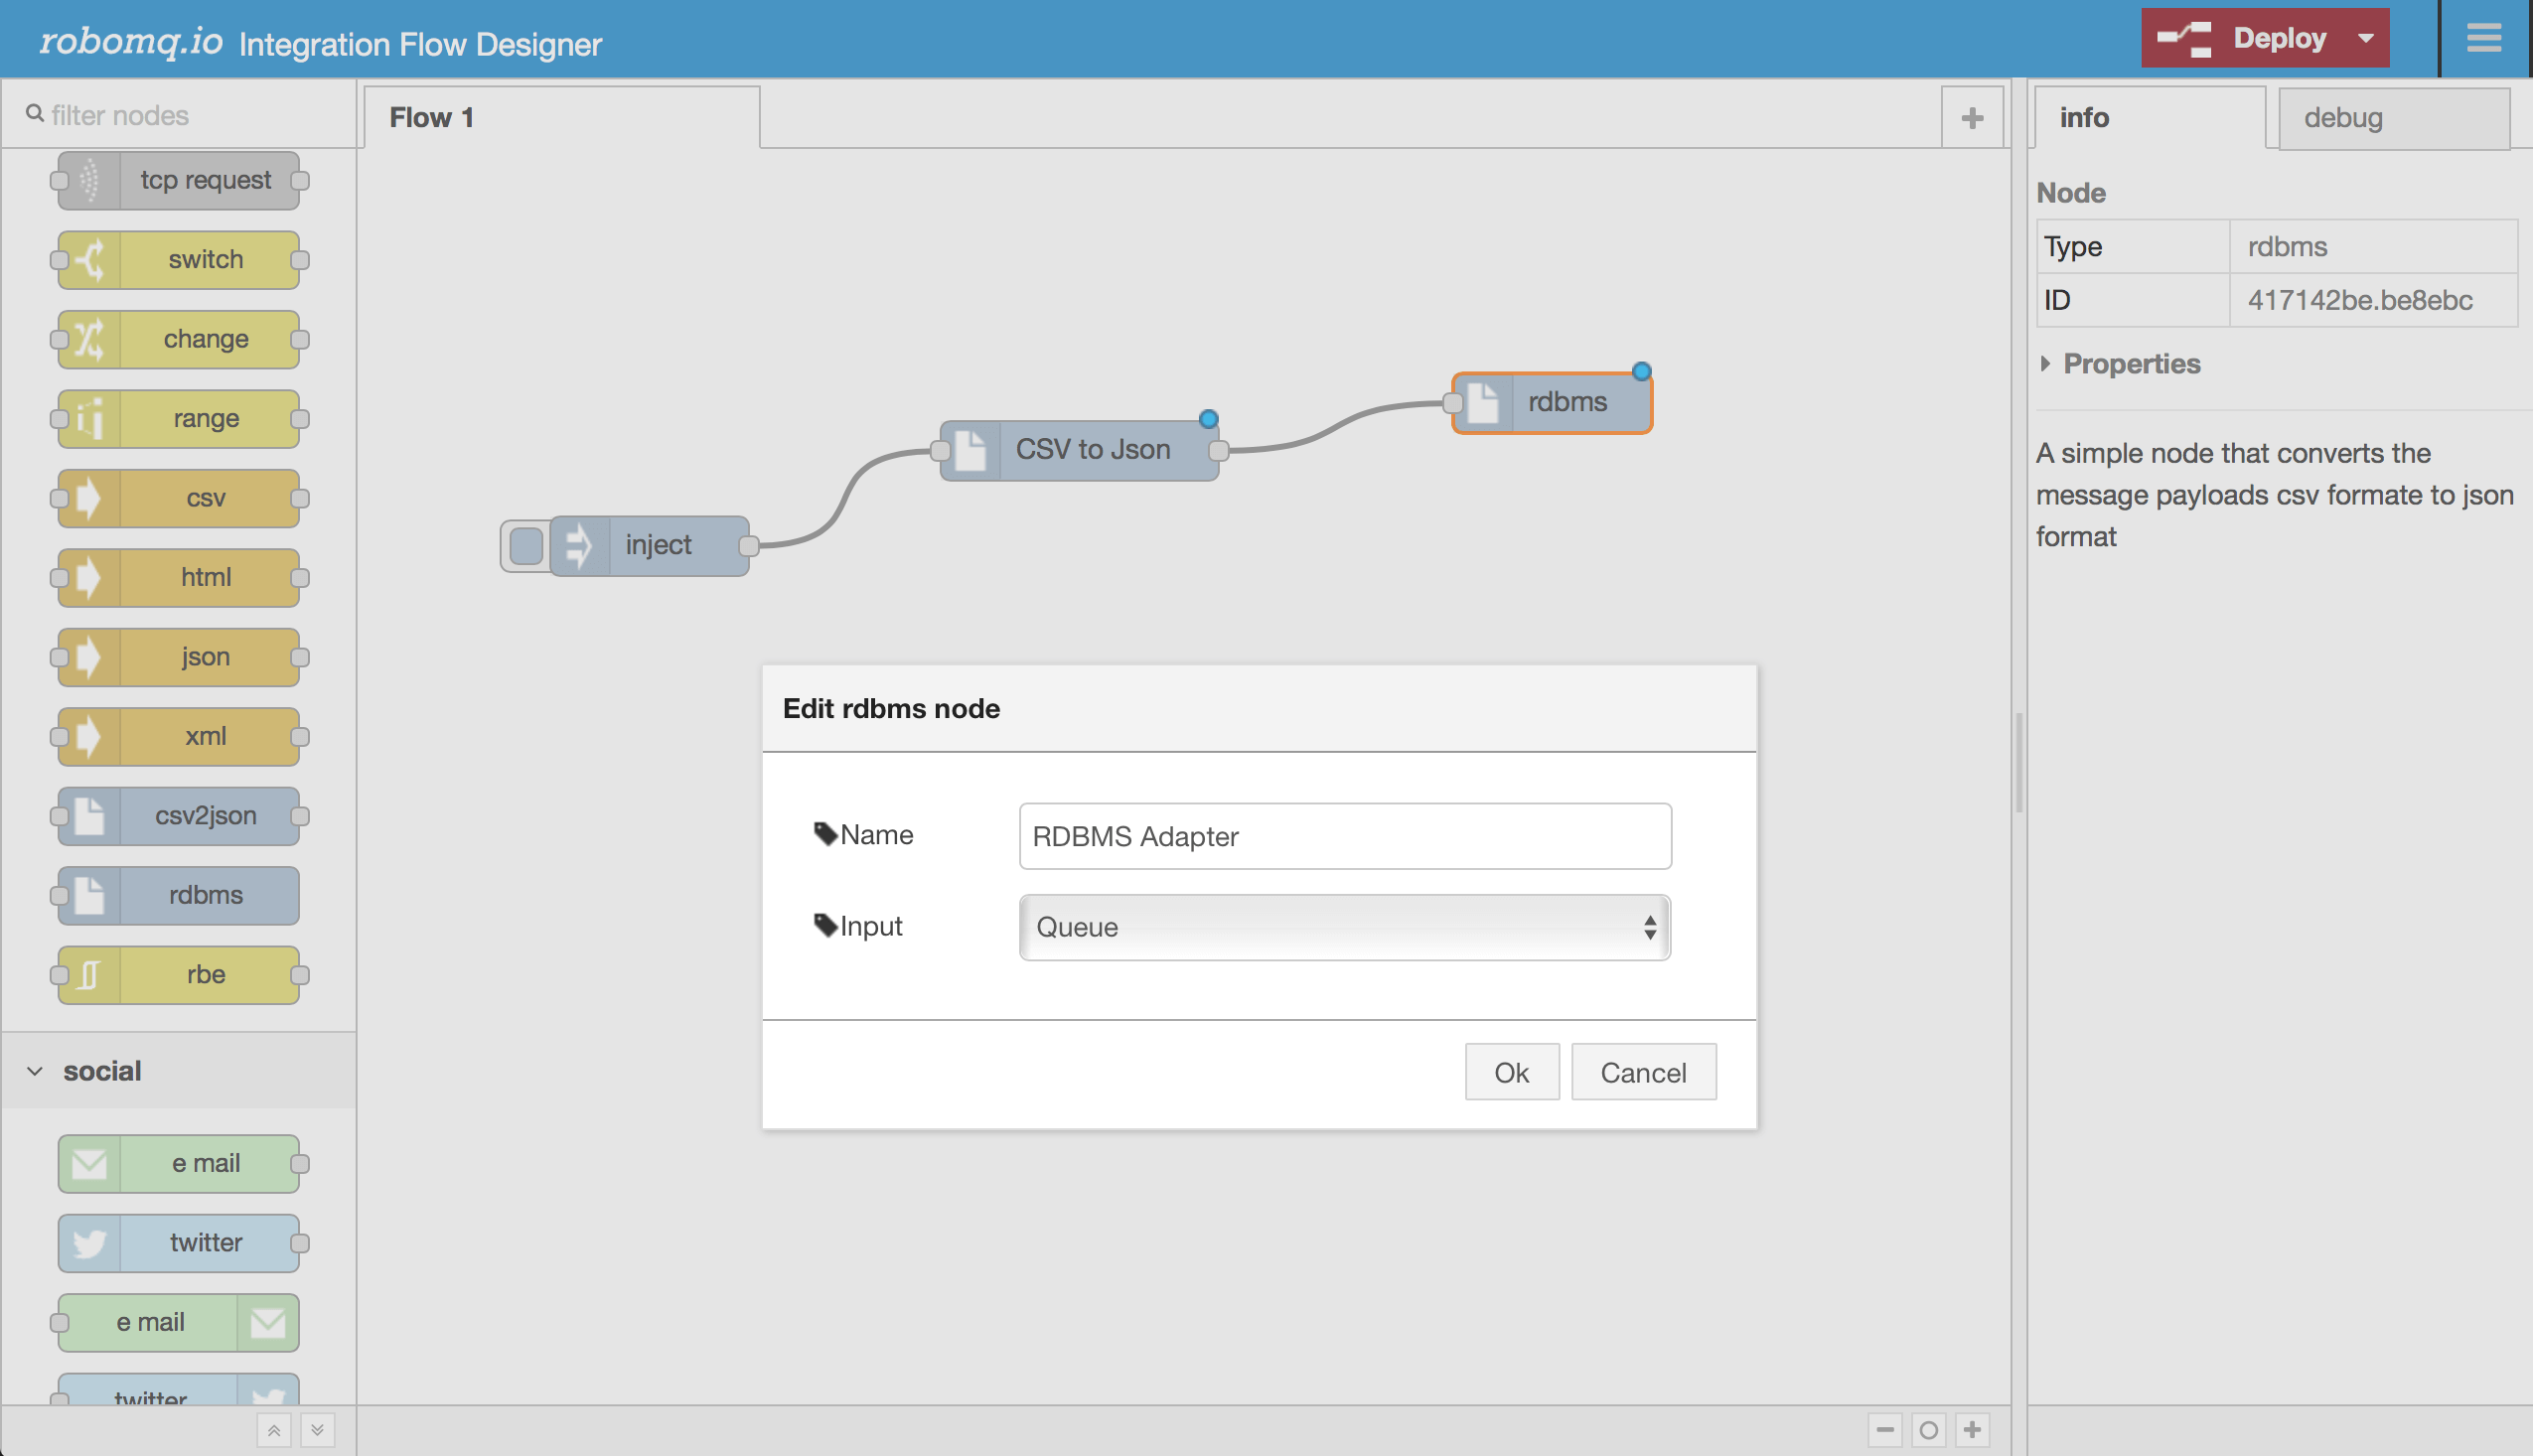
Fig. 4: Database persistence node for saving the user data into a RDBMS
You might notice that the input for the RDBMS Adapter is “Queue” which is the same queue where the previous node will put the transformed JSON output. By specifying Queue as the input and linking the nodes( or the Microservices) we are able to chain or build the sequence of processing.
Step 4: Send an email to registration point of contact
The fourth step is to send an email upon successful user registration to the person responsible for this process.
Simply select the Email Adapter node that represents a microservice running on the container management platform that specializes in sending email. Once again drag and drop the node and connect it in the sequence. You could click on the node and configure it to specify the email parameters like the email notification receiver, sender and the email server configuration.
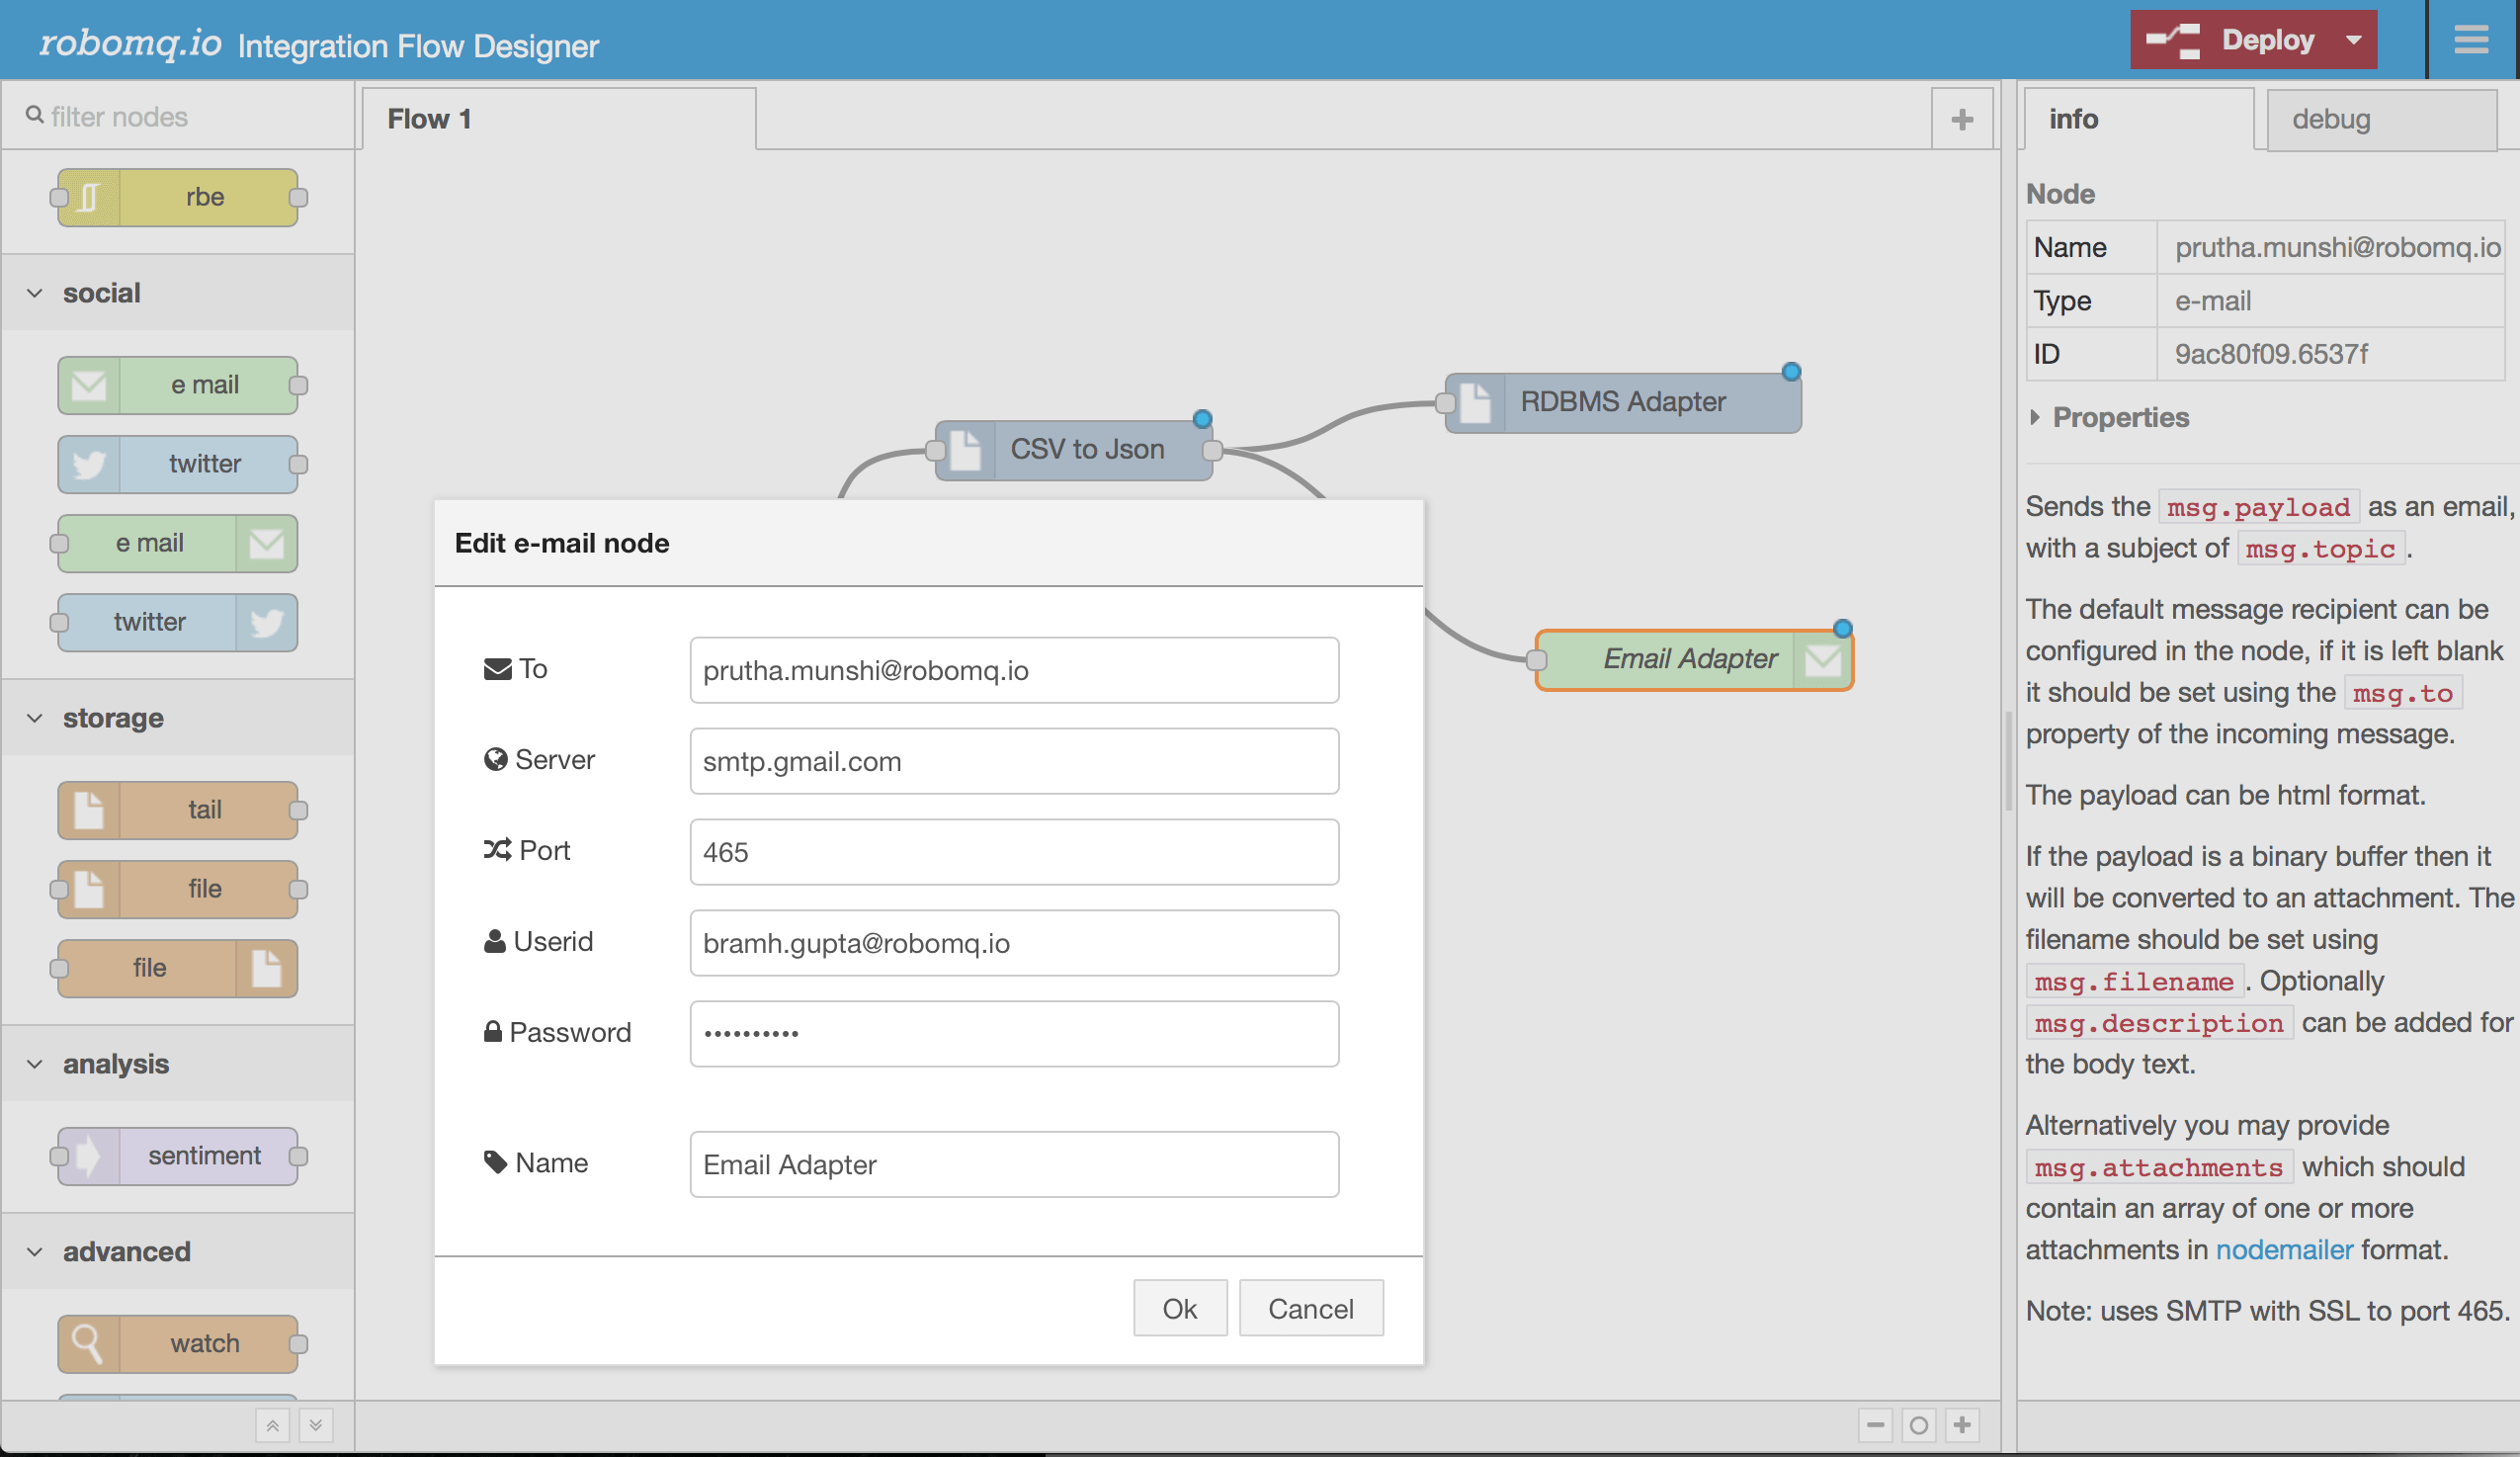
Fig. 5: Sending email using the email Microservice
At this point you have set up the whole flow with the simple drag and drop of the nodes. You have created a business process by chaining together a set of microservices running in a container management platform providing all the cool features like auto scaling, auto healing, load balancing etc ...
Now is the time to deploy the flow. This is the moment of glory, but it is also very simple. Click on red deploy button to deploy the new shiny business process that will make the flow run awaiting the input.
Once deployed it is time to test the tires. To initiate the flow, simply click on the Inject node to send some CSV data through user registration business process.
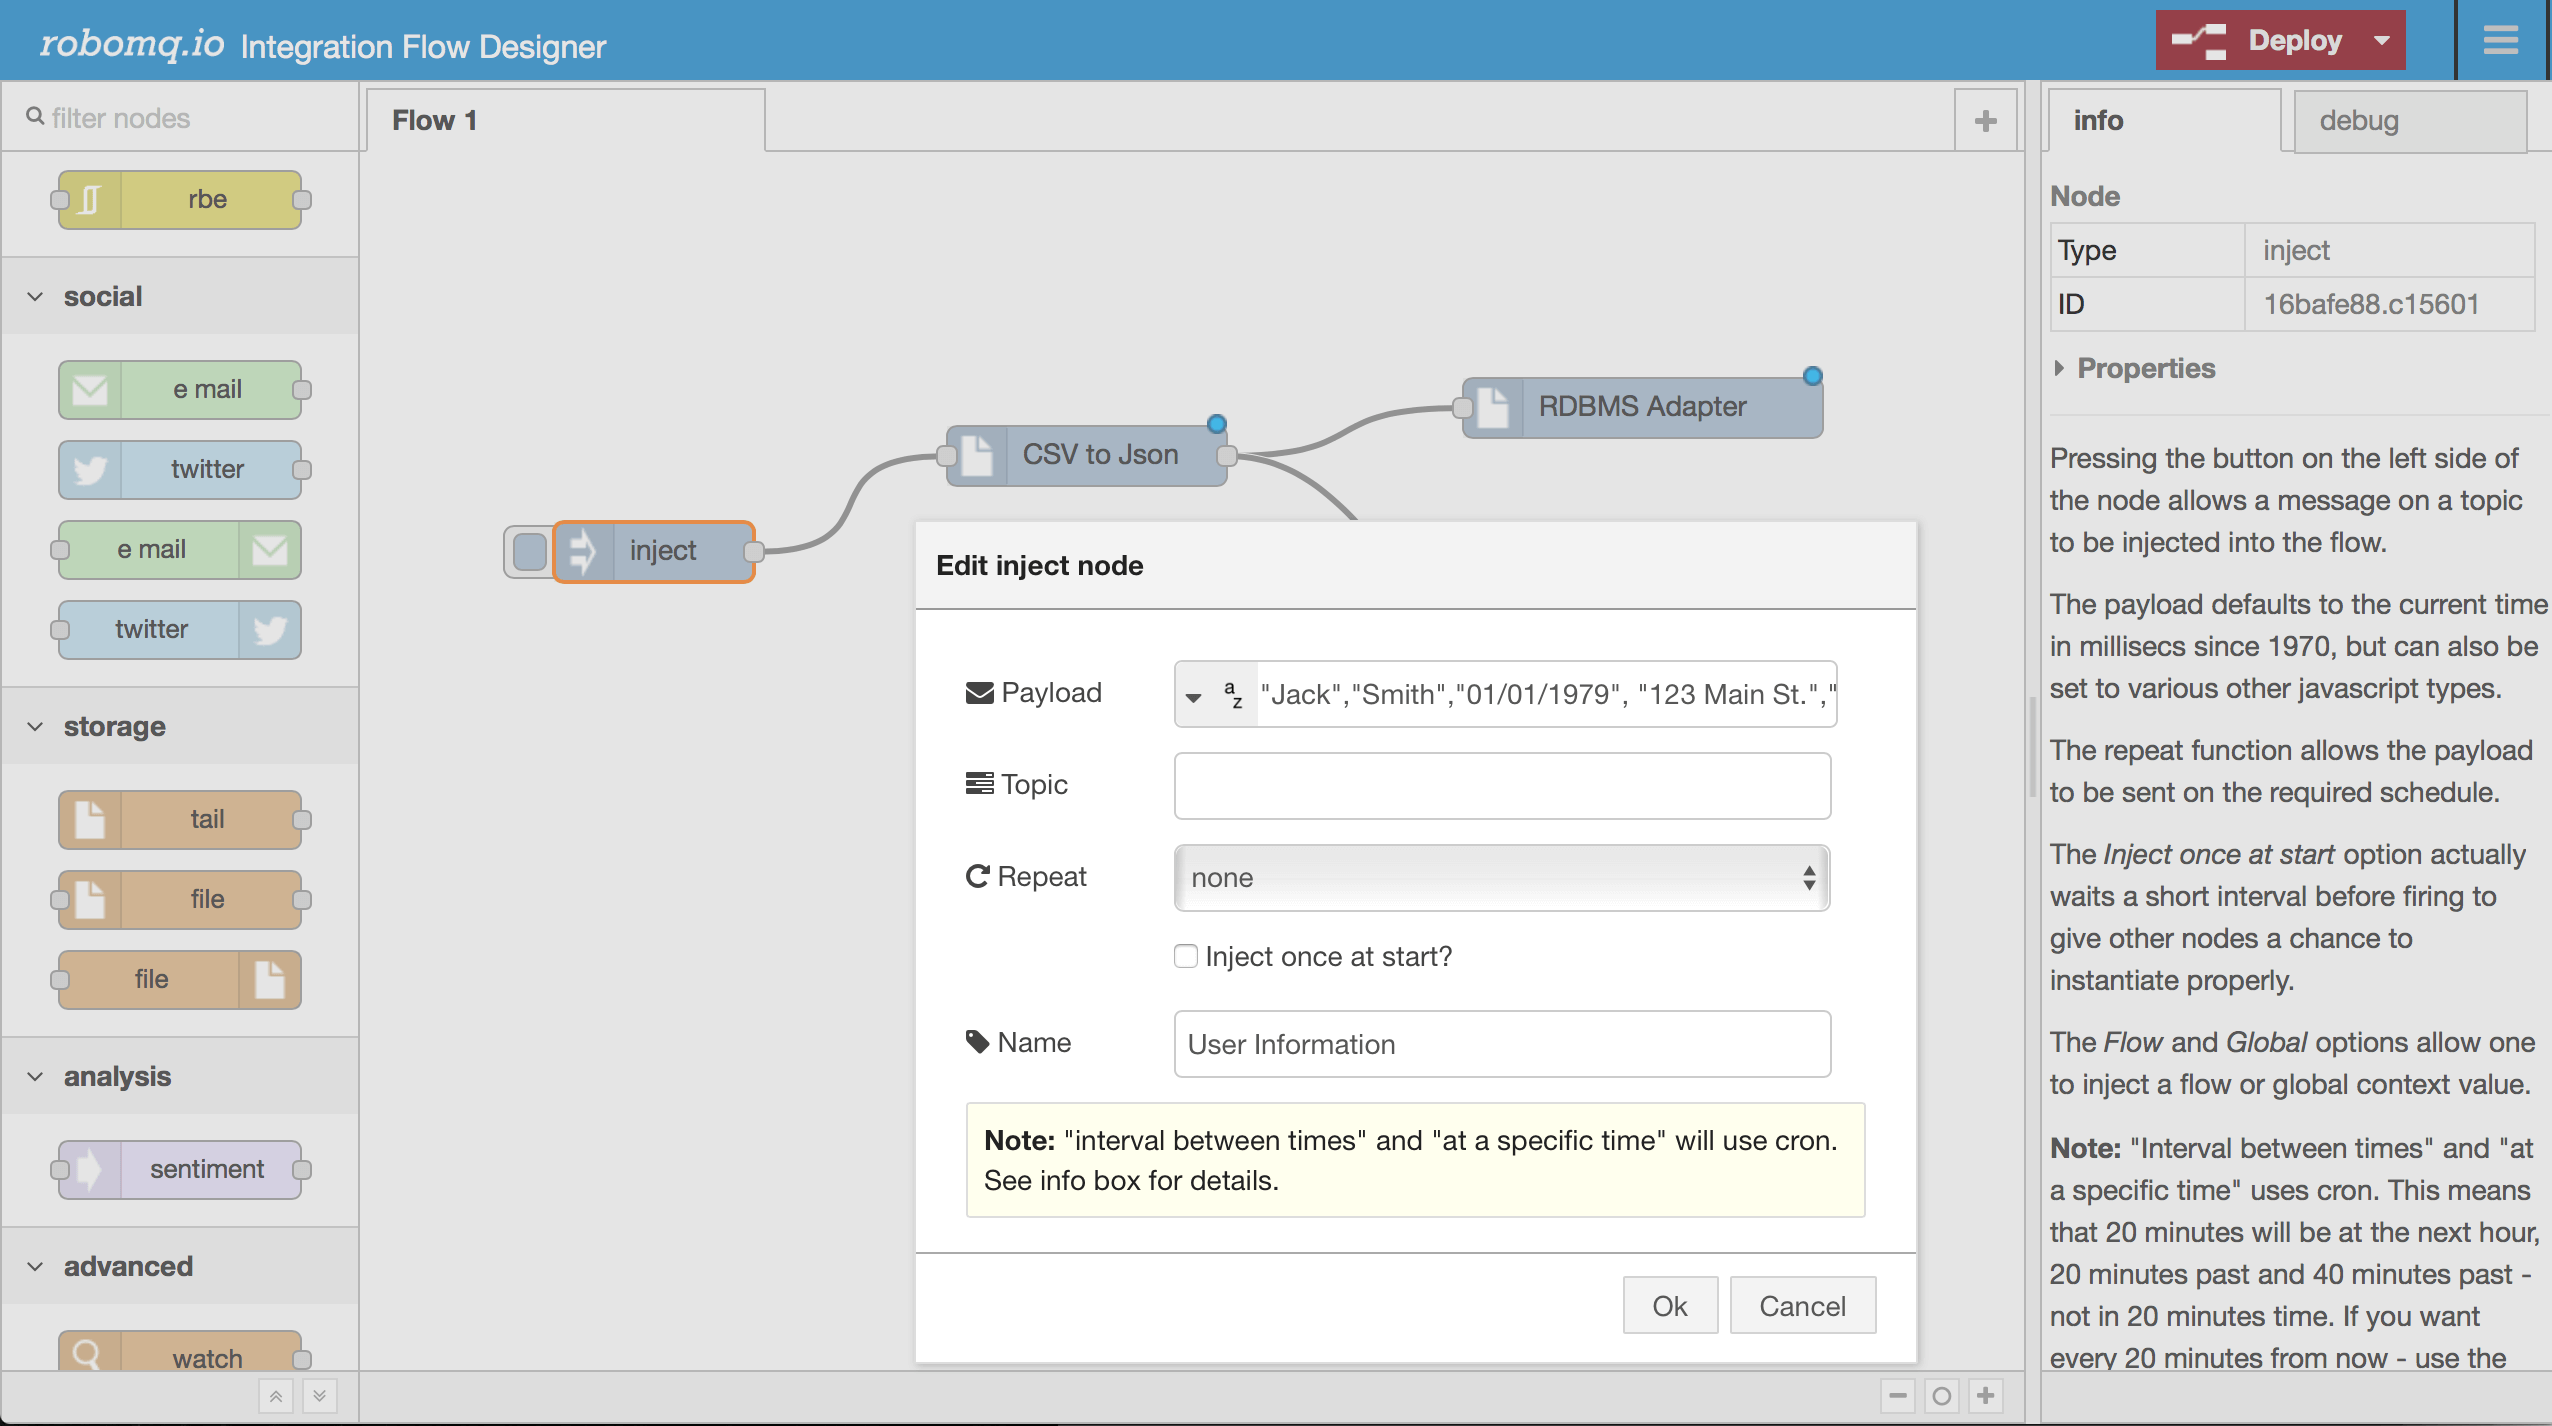
Fig. 6: Run the flow by sending some data through the Inject node
The CSV data being processed is the payload for the inject input node. In real life this could be direct read of a file using a file adapter node or an API call. Once you inject the payload the flow gets started and you should see the database entry in the use registration database as shown below.
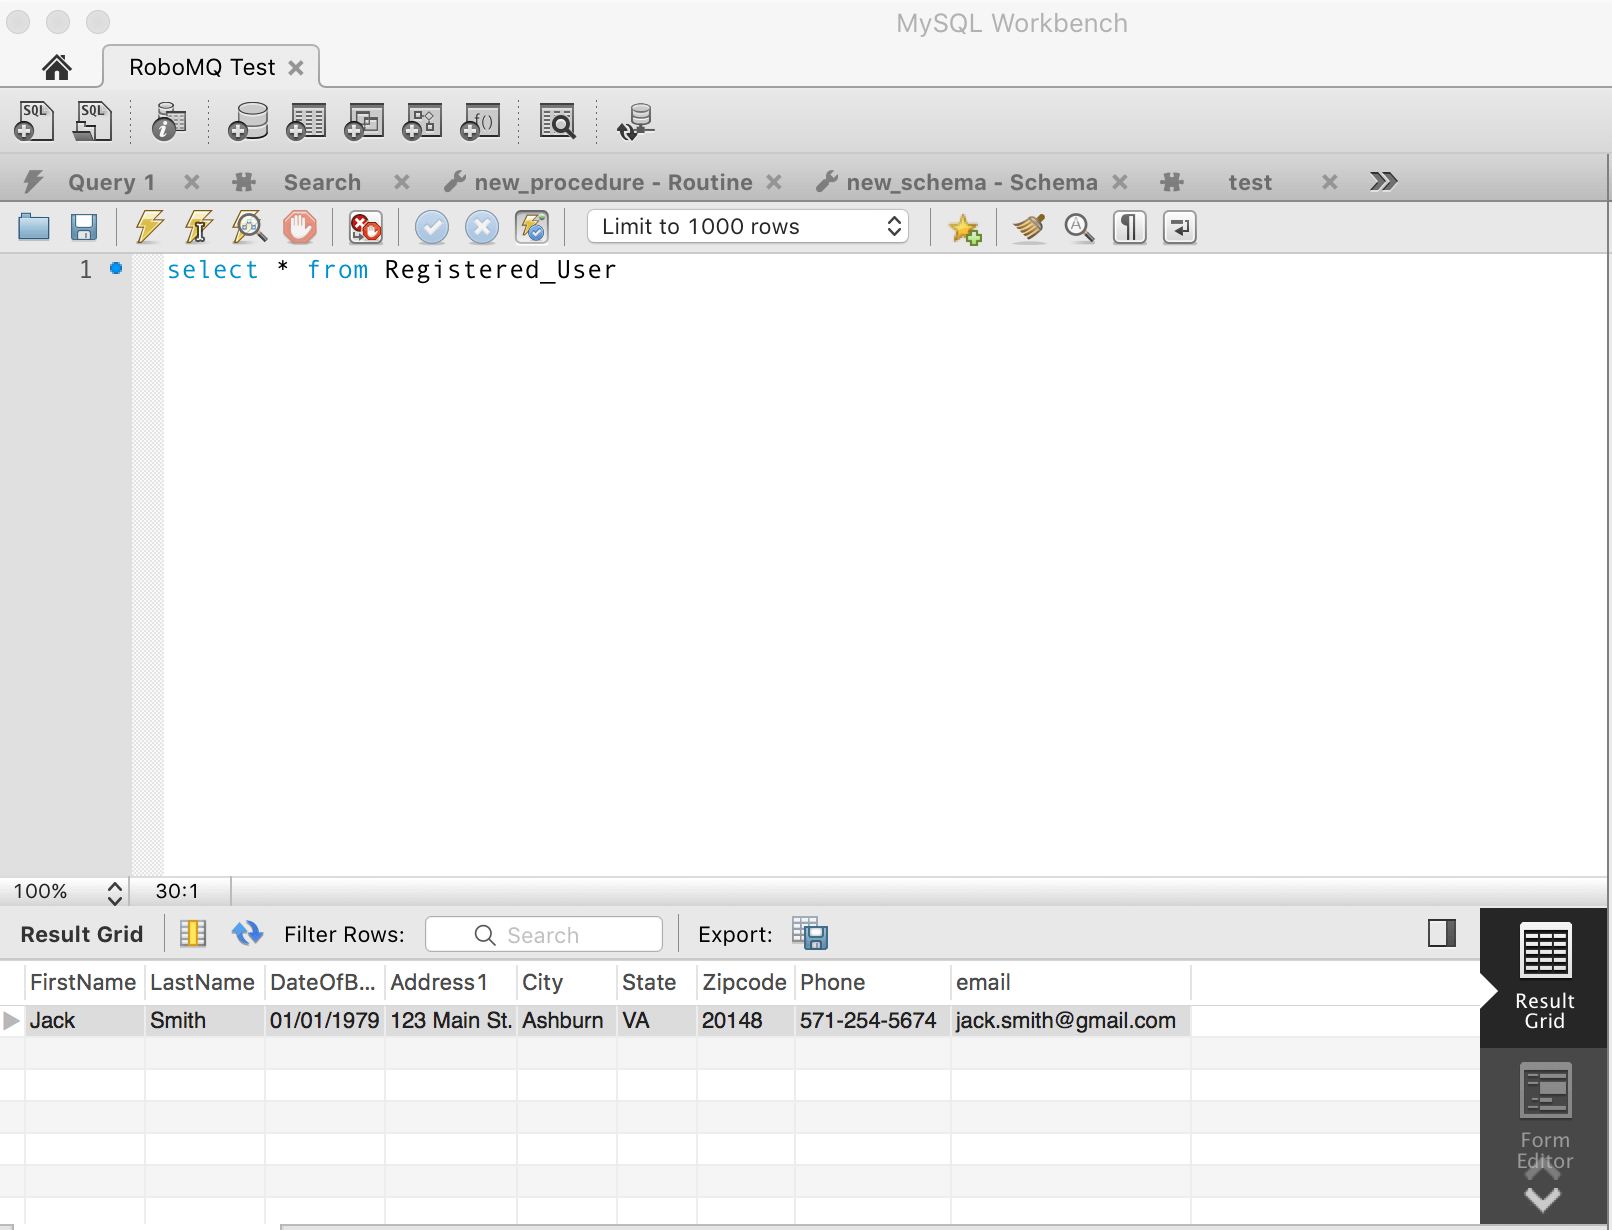
Fig. 7: User data saved in the registration database
The person responsible for the business process also receives an email notifying him or her of user registration completion as configured in the email adapter.
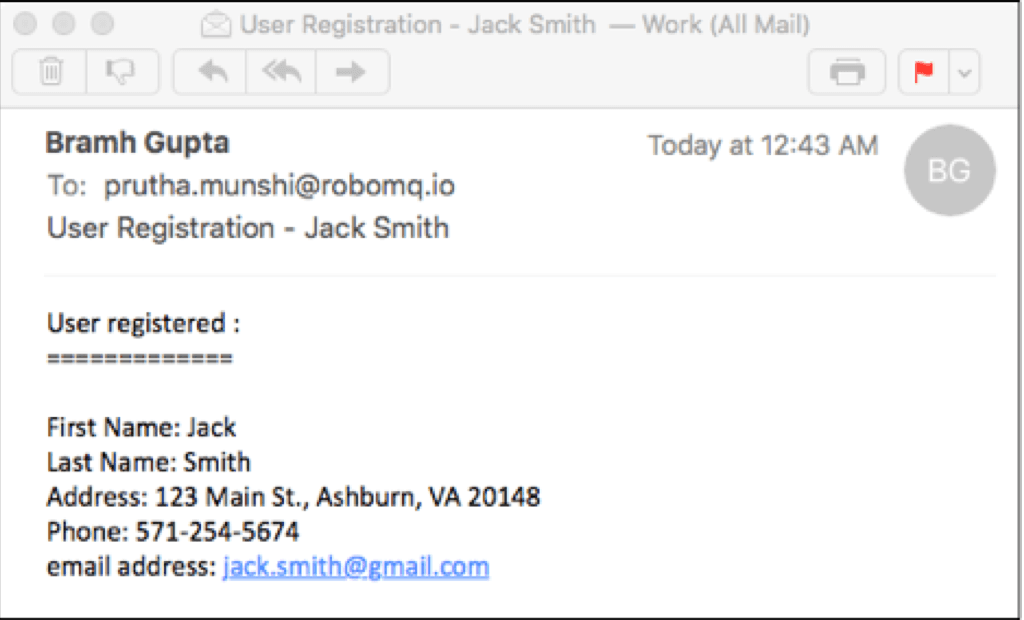
As you saw, with just a few simple drag and drop of nodes, you were able to complete a user registration flow including data persistence and email capabilities.
You could build complex business process flows using Integration Flow Designer by simply chaining together the functionality provided by Microservices with absolutely no programming needed!
Overall, Integration Flow Designer packs all the benefits of Microservices, message queues and ThingsConnect suite of adapters and connectors in a simple visual package for rapid development of integration flow and complex event processing (CEP)for SaaS and IoT use cases.
If you would like to learn more or see a demo of the product live in action send us an email at sales@robomq.io or contact us from our website.
